NOTICE: Always cross-reference the Arch Linux Wiki for the most up-to-date information.
Installing Arch
Installing Arch Linux is a rather daunting task for most beginners, considering it’s a rather large step up from what you might have already used, like Ubuntu. This guide hopes to help simplify the sheer amount of information provided by the Arch Wiki into a more directed guide in a way that I like to configure my system. If you do want to follow along, I’d strongly recommend booting up a VM in your preferred software and make snapshots along the way. I won’t cover everything in detail & you’ll most likely have to troubleshoot as things diverge, so make sure you also have the Arch wiki installation guide in another tab for easy reference.
Objectives & Requirements
Once you’ve finished with this guide, you’ll have achieved a system that has:
- LVM with encryption
- Systemd-boot as the bootloader
- A swapfile
- KDE plasma as the desktop environment
- Secure boot enabled (advanced)
Note that if you want to do this, you’ll need to have a computer that supports 64-bit UEFI and have secure boot disabled, as well as have the drive to figure things out when things (inevitably) go wrong.
Pre-installation
Before we install anything to the disk, we need to prepare our installation media & our computer.
Acquire the installation image
Head to the Arch Linux download page & grab the ISO. This will need to be flashed to a USB. Either Rufus or Etcher are good picks. You might also need to change the boot order in the UEFI to load the Arch install from the USB.
Connecting to the internet
Ahhh, the bane of Arch laptop users everywhere. Now if you’re using Ethernet or a VM, you should have internet already (ping -c 5 archlinux.org to verify) and can move onto the next step; if you’re using Wi-Fi, let’s get you up and running.
We’ll be using iwctl to help us connect.
First, we’ll need to make sure its daemon is running, then start the interactive prompt:
# systemctl start iwd# iwctlFrom here, we’ll need to see what adaptors are available:
[iwd]# device listPick an adaptor, then run the following commands:
[iwd]# station <device> scan[iwd]# station <device> get-networksThis will print out a list of available Wi-Fi networks. Once you connect to your Wi-Fi network, you’ll be prompted to supply a password if needed.
[iwd]# station <device> connect <SSID>Once you’re connected, exit out of the prompt and verify you have internet access:
[iwd]# exit# ping -c 5 archlinux.orgIf everything is working, we can move on.
Partitioning the disk
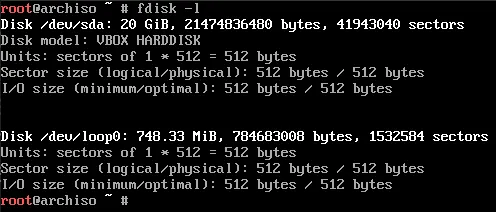
I hope you backed up your data on your drive, ‘cause this step is gonna cause data loss. First, you’ll need to see what device your storage drive is using fdisk:
# fdisk -lYou should see your disk assigned as something like /dev/sda or /dev/nvme0n1. In my case, it’s /dev/sda, which I’ll be continuing to use for this tutorial.
We’ll then want to go into the interactive prompt:
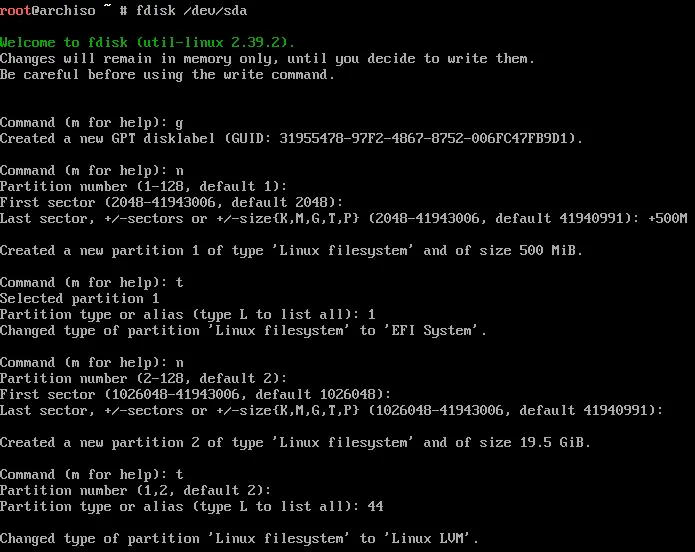
# fdisk /dev/sdaFor this step, we’ll be creating 2 partitions, a boot partition /boot, and the root partition /.
You’ll first want to wipe the drive blank with g, then n for a new partition. Select the default for both the partition number and the first sector but set the last sector to +500M. We’ll then need to change the partition type to a EFI partition, which we’ll do with t with the type being 1.
We then repeat the steps for the root partition; n, select all defaults, followed by t with type 44 (note that the type can change as fdisk is updated, type L to list all of the types, and find the number with Linux LVM).
Once you’ve done that, type p to get the proposed partition layout and see if it looks the same as mine.
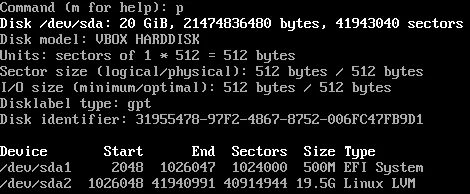
Once you’re happy, type w to confirm the changes to disk, which you’ll now be able to see in fdisk -l. We’ll now need to format the /boot partition with FAT32, which is done with:
# mkfs.fat -F32 /dev/sda1LVM with Encryption
So, what is LVM? LVM stands for Logical Volume Manager, which allows our files to be stored in a volume instead of directly on the partition. This allows for easy dynamic resizing of volumes, something which is quite difficult to do with partitions. Regardless of whether you end up using it or not, it’s always good to have just in case, as there is no downside for having it. These volumes will reside inside our partition which will be encrypted with LUKS, with more info found on the wiki.
Encrypting the partition
First, we’ll need to encrypt the partition. Make sure you set a strong password (or even better, a passphrase) and make sure you don’t forget it!
# cryptsetup luksFormat /dev/sda2We’ll then need to access the encrypted partition:
# cryptsetup open /dev/sda2 cryptlvmNow as you’ve opened the encrypted partition, it created a decrypted reference in RAM, which you can find at /dev/mapper/cryptlvm.
Setting up LVM
Now for LVM. First, we’ll need to create a physical volume:
# pvcreate /dev/mapper/cryptlvmFollowed by a volume group (you can name the volume group to be anything, this guide will use volgroup0):
# vgcreate volgroup0 /dev/mapper/cryptlvmWe’ll now create 2 logical volumes, one for root /, and the other for the home folder /home. For our root folder, 32GB will be more than enough, and the home folder will take up the rest of the space.
# lvcreate -L 32G volgroup0 -n lv_root# lvcreate -l 100%FREE volgroup0 -n lv_homeNow as we’ll be formatting these volumes with ext4, we’ll leave 256MB free in volgroup0 to allow for automated error checking and trimming.
# lvreduce -L -256M volgroup0/lv_homeNow we’ll format the volumes with ext4:
# mkfs.ext4 /dev/volgroup0/lv_root# mkfs.ext4 /dev/volgroup0/lv_homeAnd mount the file systems:
# mount /dev/volgroup0/lv_root /mnt# mount --mkdir /dev/volgroup0/lv_home /mnt/home# mount --mkdir /dev/sda1 /mnt/bootFinally, we’ll create a fstab file to allow our operating system to know what devices it needs to mount at boot. Once you generate the fstab file, print it out with cat and see if everything looks good.
# genfstab -U /mnt >> /mnt/etc/fstab# cat /mnt/etc/fstabYour fstab file should look similar to mine, ignoring the UUIDs (note that the last line is wrapped). For the last line, you’ll need to change it to contain fmask=0077,dmask=0077.
If the rest of the file doesn’t match the image below, read through the above again to make sure you haven’t missed a step, and refer to the Arch Wiki to make sure that the information here isn’t outdated.

Installation & Configuration
Now we’ve set up everything, now we can actually start to install Arch Linux onto your system, how exciting!
Installation
We’ll need to install the base package, as well as Linux itself, of course! Now, as for packages, I’d recommend installing both linux and linux-lts plus their headers, just in case something breaks in the kernel and you need to head to a known LTS version. However, I’ve personally never needed to use the linux-lts. If you’re following along in a VM, you can omit installing linux-firmware.
# pacstrap -K /mnt base linux linux-headers linux-lts linux-lts-headers linux-firmwareWe’ll now chroot into our working installation to continue downloading more packages:
# arch-chroot /mntPackages
There are some additional packages we’ll need to install:
# pacman -S lvm2 networkmanagerThis will provide LVM support and network management to connect to the internet.
Now as the base package doesn’t contain all of the tools we might like to use in our installation, here’s a list of packages you might wanna consider installing:
nanoorvim: CLI text editors. If you’re not familiar withvim, go withnano.base-devel: A collection of development packages.iwdwpa_supplicant: If you want Wi-Fi support, you’ll need these. Recommended even if you’re not going to use Wi-Fi, in case you need them down the road.man-db man-pages: Used for reading man pages.amd-ucodeorintel-ucode: Download the package matching your CPU. These provide microcode updates to your CPU.
Configuration
Time to configure!
Time zones
We’ll also want to configure the appropriate time zone for your location. You can view your region and city in /usr/share/zoneinfo/. For example, if you lived in Sydney Australia, you’d write the following command:
# ln -sf /usr/share/zoneinfo/Australia/Sydney /etc/localtimeThen configure the hardware clock:
# hwclock --systohcLocalization
Edit the locale.gen file and uncomment the appropriate UTF-8 locals. In my case it would be en_US.UTF-8 UTF-8. Once you’ve picked your locale files, generate them:
# nano /etc/locale.gen# locale-genThen create a locale.conf file with the LANG variable.
echo "LANG=en_AU.UTF-8" | tee /etc/locale.confNetwork config
Let’s make sure networking will be up and running once we finish our install:
# systemctl enable NetworkManager.service# systemctl enable systemd-resolved.service# systemctl enable wpa_supplicant.serviceWe also need to setup the DHCP client if you’re using Wi-Fi, which we’ll do with iwd. Create a new file at /etc/iwd/main.conf, and add the following to the file:
[General]EnableNetworkConfiguration=trueAnd finally, we need to set our hostname. Imma pick GravyArch:
# echo "GravyArch" | tee /etc/hostnameInitramfs
As we have both LVM & encryption, we’ll need to modify the initramfs. When editing /etc/mkinitcpio.conf, find the first uncommented line that starts with HOOKS. From there, you’ll want to add the words encrypt lvm2 in between block & filesystems. Note that the order is important.

Then we need to regenerate all of the initramfs:
# mkinitcpio -PPasswords & Users
We’ll want to set a root password (we’ll disable root login after our installation later for security).
# passwdAs it’s generally unwise to do everything in root once our system is installed, let’s add a user. I’ll use the username gravy and add the user to the group wheel.
# useradd -mg users -G wheel gravyThen give the user a password.
# passwd gravyThen to give our user root privileges via sudo, we’ll need to configure sudo and uncomment the line %wheel ALL=(ALL) ALL:
# EDITOR=nano visudoAnd now our user will have sudo privileges!
The Bootloader
Our system is now finally configured, but it won’t boot without a bootloader! We’ll be using systemd-boot as mentioned before, which has already been pre-installed onto our system. To install systemd-boot, we run the following command:
# bootctl installBut we’re not done yet. We still need to configure our boot partition. Copy the following text into /boot/loader/loader.conf (make sure you only use spaces, tabs won’t work!):
default arch.conftimeout 5console-mode keepeditor noThis is the config file for systemd-boot. Now we need to define the boot entries. First, we want to set a label for our encrypted partition. Let’s call it arch_os:
# cryptsetup config --label="arch_os" /dev/sda2Now copy the following text into /boot/loader/entries/arch.conf (assuming you installed the amd-ucode and linux package, change the text as needed to support your system):
title Arch Linuxlinux /vmlinuz-linuxinitrd /amd-ucode.imginitrd /initramfs-linux.imgoptions cryptdevice=LABEL=arch_os:volgroup0:allow-discards root=/dev/volgroup0/lv_root rwAnd do the same for the fallback initramfs:
title Arch Linux (Fallback)linux /vmlinuz-linuxinitrd /amd-ucode.imginitrd /initramfs-linux-fallback.imgoptions cryptdevice=LABEL=arch_os:volgroup0:allow-discards root=/dev/volgroup0/lv_root rwIf you installed another version of linux (like linux-lts), repeat for each new linux version.
Reboot
Exit the chroot with exit, and type:
# umount -R /mntThis will unmount the partitions. Remove the installation media & type reboot. If all goes well, you should boot into Arch Linux!
Post-Installation
If you’ve booted up into your Arch install, unlock your disk encryption & login using root.
Desktop Environment
Now I’m not sure about you, but interacting with the raw CLI gets old rather quickly. Let’s get a Desktop Environment set up! Now I’d recommend having a look at the many options to choose from, including window managers, though I’ll be picking KDE-Plasma. I’ll also be installing its full set of applications along with it as well as the Xorg display server.
# pacman -S plasma-meta kde-applications xorg-serverWe’ll also need to install the graphics drivers. If you use Intel or AMD graphics, use the mesa package. If you use Nvidia, you’ll need to install nvidia and/or nvidia-lts depending on what linux version you installed.
If you’re using a VM, install virtualbox-guest-utils and enable vboxservice.service.
We also need to enable our display manager (the lock screen):
# systemctl enable sddmOnce that is all done, reboot.
Disabling root login
You’ll want to login as a non-root privileged user for this one. Simply type the following commands to disable root login:
$ sudo passwd -l rootif you want to become root, simply type:
$ sudo -sGenerating a swapfile
A swapfile is where the operating system can place some of its stale memory if the RAM ever becomes full. First, we need to generate a file to become a swapfile, let’s say 2GB:
# dd if=/dev/zero of=/swapfile bs=1M count=2k status=progressWe’ll then need to set it to read and write by root only.
# chmod 600 /swapfileThen we need to format the file to be a swapfile:
# mkswap -U clear /swapfileWe now need the system to mount the swapfile as swap in out fstab configuration. First make a backup, then write the following command:
# cp /etc/fstab /etc/fstab.bak# echo "/swapfile none swap defaults 0 0" | tee -a /etc/fstabCheck your fstab configuration to make sure that the swapfile entry isn’t the only entry. Your swapfile will then be used once you restart your computer, or if you want to activate it now:
# swapon /swapfileSecure Boot (Advanced)
We’ll be using sbctl to manage and setup secure boot. Just be advised that it does not work with all hardware. More details can be found here.
You’ll need to install the following packages:
efibootmgr: Configuration of boot order, and anything else with the UEFIsbctl: Assisted Configuration and management Secure Bootshim-signed: A pre-signed bootloader (needs to be installed from the AUR)
Enable Setup Mode
You’ll first need to enter the UEFI and change Secure Boot to “Setup Mode”. As each manufacturer has a different layout, you’ll have to figure this out on your own, but it will most likely be under the “Security” banner.
Setting up shim
Once you’ve installed shim-signed from the AUR, run the following command to rename your current bootloader:
# mv /boot/EFI/BOOT/BOOTx64.EFI /boot/EFI/BOOT/grubx64.efiYou’ll then want to copy the shim files over, renaming them in the process:
# cp /usr/share/shim-signed/shimx64.efi /boot/EFI/BOOT/BOOTx64.EFI# cp /usr/share/shim-signed/mmx64.efi /boot/EFI/BOOT/Then add a new entry into the boot order using efibootmgr:
# efibootmgr --unicode --disk /dev/sda --part 1 --create --label "Shim" --loader /EFI/BOOT/BOOTx64.EFIWhat this does is that when shim is executed, it will try and launch a file called grubx64.efi, and verify its hash with mmx64.efi (more details here).
Using sbctl
Now we’ll use sbctl to assist us. More info can be found here. First check to see if secure boot is in setup mode:
$ sbctl statusYou should see that sbctl is not installed and secure boot is disabled.
We’ll then want to create new keys, and enroll them with Microsoft’s keys:
# sbctl create-keys# sbctl enroll-keys -mThen re-check the status:
$ sbctl statussbctl should now be installed, but now we’ll need to sign our files. Let’s verify what files need to be signed:
# sbctl verifySign all files listed but note that you may need to manually sign additional files, usually the kernel & bootloader files.
# sbctl sign -s /boot/vmlinuz-linux# sbctl sign -s /boot/EFI/BOOT/BOOTX64.EFIAs we are using systemd-boot, we also need to sign an additional file to ensure that all of the files are signed when the bootloader is updated:
# sbctl sign -s -o /usr/lib/systemd/boot/efi/systemd-bootx64.efi.signed /usr/lib/systemd/boot/efi/systemd-bootx64.efiOnce everything is signed, reboot your system and enable secure boot in the UEFI. If everything loads, secure boot should be working, which you can verify with:
$ sbctl statusWrapping up
Hopefully this guide has assisted you in running Arch Linux for the first time, although this set up is a bit more complicated than it needs to be. I’d also highly recommend exploring other packages, desktop environments, etc. to make your system yours. I’d also recommend looking at the Arch Wiki’s General Recommendations for anything I didn’t cover. Best of luck!